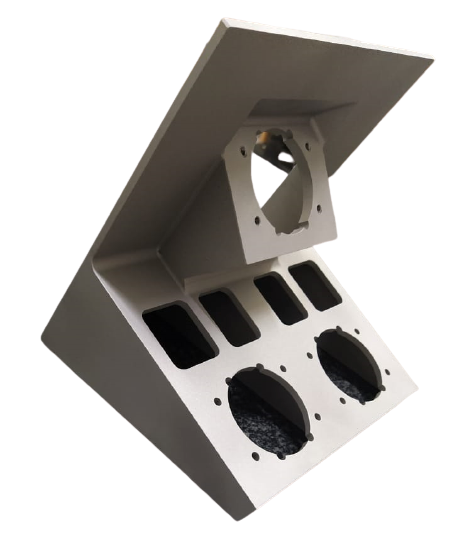
Legacy Components for Indian Space Industry in Metal Additive Manufacturing.
About Objectify Technologies
Objectify Technologies is India’s only in-house metal and polymer AM-ESP (Additive Manufacturing Engineering Service Provider) with expertise in aerospace, automotive, tooling, white goods and medical component building and consulting. Our objective is to ensure the widespread acceptance of Additive Manufacturing / 3D Printing across all industries supply chain & become a flag bearer to Additive Manufacturing information.
Collaboration with
The Vikram Sarabhai Space Centre (VSSC) is one of the main research and development establishments within ISRO. VSSC is an entirely indigenous facility working on the development of sounding rockets, the Rohini and Menaka launchers, and SLV, ASLV, PSLV, GSLV and GSLV Mk III families of launch vehicles.
The Indian Space Research Organization (ISRO) is the space agency of the Government of India and has its headquarters in the city of Bangalore. Its vision is to “harness space technology for national development while pursuing space science research & planetary exploration”.
Abstract
Additive manufacturing or 3D printing is perceived as an innovative processing method to replace traditionally produced parts, including castings and multi component parts. 3D printing helps to create parts in a brief timeframe, with least material wastage and permitting more elevated level of customization. In this case two brackets were made using AISI-316L grade for aviation applications using laser powder bed fusion technology. A thorough analysis was performed on the powder, to check for structural integrity to qualify the component for functional testing. A large amount of material was removed, extreme machining time and related issues, for example, residual stress and warpage conceived which would happen in conventional methods have been eradicated by taking up Additive Manufacturing. The mechanical properties meet the prerequisites of ASTM F 3184-16 norm resulting in similar or better part built. Despite the successful built a minor contortion was noticed in the thin wall region which was resolved by adding extra stock in the thin section and later post processed by machining. The brackets were found to be free from any defects > 100 µm as non-destructive testing was performed by large macro CT. Furthermore, it has been identified that there is ample scope of Topology optimization which can lead to weight saving, thus increasing efficiency.
The Challenge
The conventional producing of AISI-316L brackets relies on casting and shaping of bulk feed stock materials, followed by subsequent machining to final shapes and dimensions. These ancient manufacturing processes forever inevitably end in an outsized quantity of fabric waste, high machine hours, high producing value and long lead times. The material needs for producing Type-I bracket of weight three.5 kg was calculable to be a forged/rolled block of 100 kg and thickness 125 mm, wherein 96.5% of fabric is wasted throughout machining. The buy to fly ratio is ~ 28 just in case of a conventionally factory-made one. Additive manufacturing will bring down the get to fly ratio to ~ 1, leading to significant value and time savings.
The Solution
A reduction of lead time and cost will be achieved for parts thanks to a number of the characteristics of AM; shorter lead time from design to production, adaptability to design changes, complicated geometries at no additional price and significantly less post-processing as compared with the conventional production routes. For this case we found Powder Bed Fusion to be the most suitable and optimum option to ensure part-built quality and integrity.
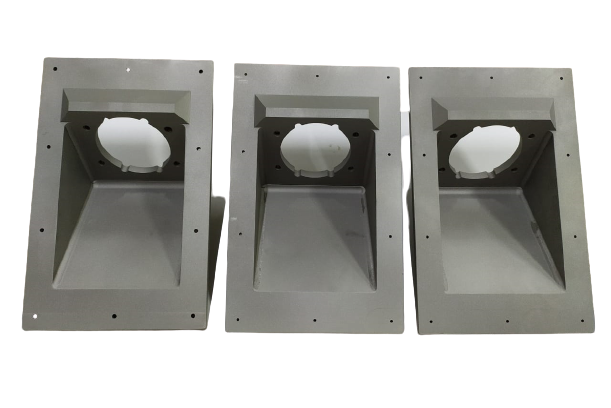
Process and Specification
Stress-relieving of 3D-printed brackets and was performed by soaking at 600 °C for 2 hrs. as per AMS 2759-4C. The temperature of 600 °C is adequate, as 3D printing doesn’t generate any major residual stresses like thick section molded product. Also, a high-temperature stress-relieving would cause distortion of thin sections. Brackets were subjected to sandblasting for improving the surface finish.
The following activities were performed in the entire Additive Manufacturing process:
• Mechanical Property improved.
• Microstructural Evaluation at par.
• Computed Metro Tomography (CT) Inspection was successful.
• Dimensions and Geometrical Inspection ensured accuracy of the final part.
• Structural Testing resulted in real-time results.
Testing and Approvals
Computed metro tomography analysis confirms the soundness of brackets realized by 3D printing. The porosity level in this process is higher than that of wrought products and size approximated to be 100 µm; however, this will not affect the functionality of the products. It may also be noted that the porosity noticed in 3D printed components is less than the sizes resolvable by conventional NDT techniques such as ultrasonic testing and X-radiography.
Comparison
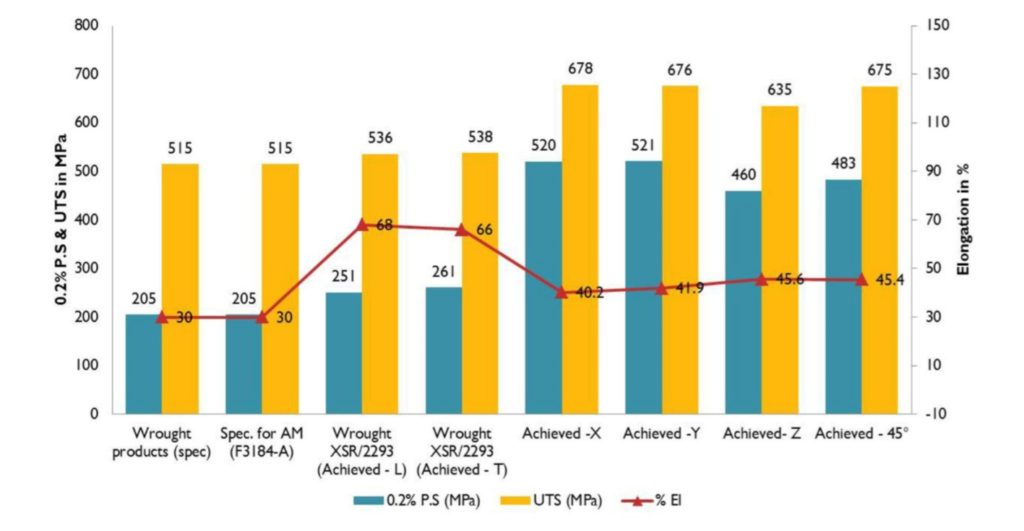
The tensile properties achieved by LPBF 3D printing process for AISI-316L have been compared with wrought products of 100 mm section thickness as shown above. It is observed that the yield strength achieved in the LPBF process is much higher than that achieved by wrought products, whereas % elongation is on the lower side. Similar trend of mechanical properties has been reported. In this case, it may be noted that AISI-316L stainless steel wrought products are processed by hot working, followed by solution annealing at temperature ~ 1040 °C. LPBF being a layer by layer processing, stress relieving at 600 °C is adequate for relieving the residual stresses generated by the processing.
Microstructure
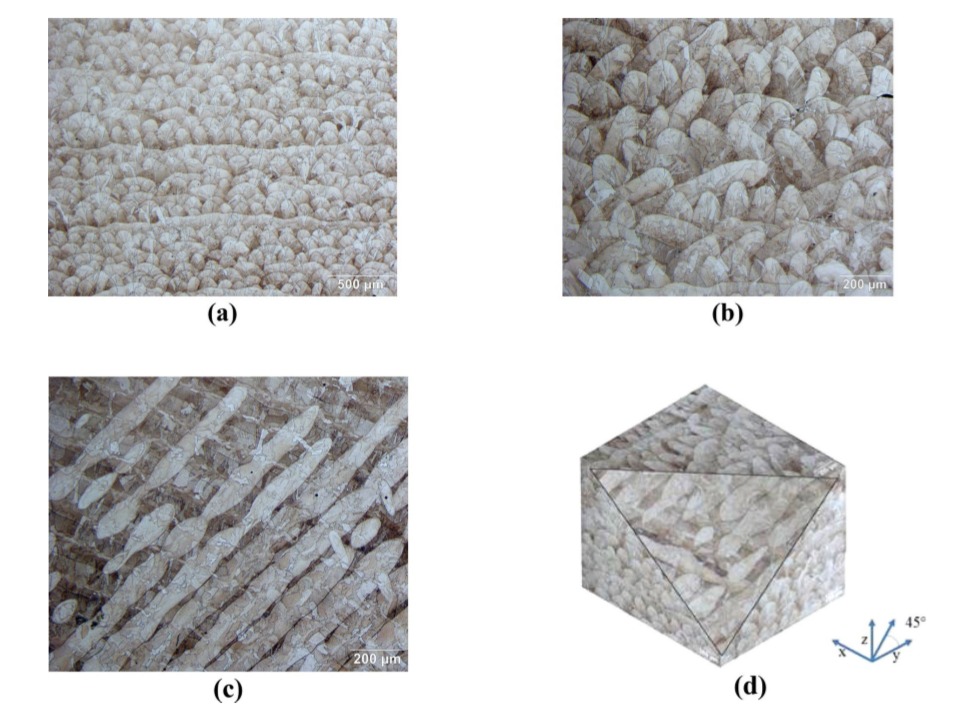
Subsequent to tensile testing, the cross section of tensile specimen ends was prepared as per conventional metallographic polishing and then etched using 10% oxalic acid electrolytic reagent to reveal the microstructure as shown in Fig. 5a–d. The microstructures shown below revealed that the thickness of each melt pool layer was ~ 100 µm, indicating two to three layers of power are fused during each laser beam scan.
Orientation
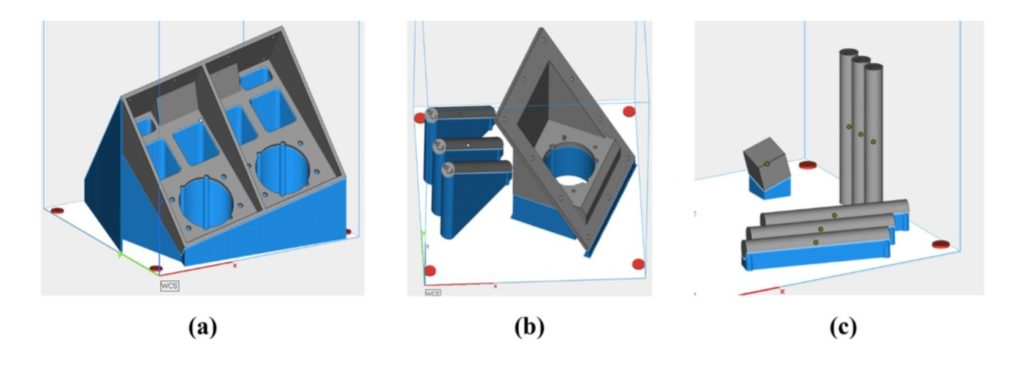
The ‘standard specification for additive manufacturing stainless steel alloy with powder bed fusion as per ASTM F3184-16 in Class A condition (stress relieved condition)’ was followed for 3D printing of these brackets. Test coupons in four directions (X, Y, Z and 45° to XY, YZ and ZX planes, i.e., body diagonal of an imaginary cube) were 3D printed along with the brackets for evaluating the tensile properties and impact strength. Build orientation followed for 3D printing of brackets and test coupons for characterization are as shown above.
Tensile
To compare the mechanical properties of LPBF 3D printed AISI-316L test in solution-annealed condition, the specimens were subjected to solution annealing and tensile properties were evaluated. The comparison is shown above. These results confirm that the LPBF process can give better mechanical properties (including the minimum guaranteed % elongation) as compared to the conventional wrought products even in solution-annealed condition.
Testing
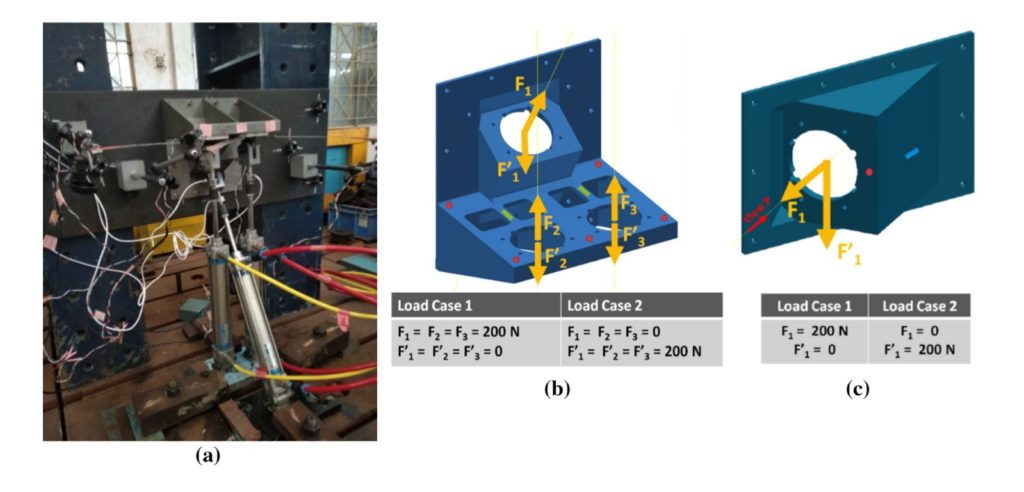
Functional acceptance tests of LPBF 3D printed brackets were performed by structural testing (test setup shown below) by applying four times the actual thrust and inertial loads. The brackets successfully withstood the test, and strains observed were very benign/negligible of ± 9 με in tension and compression loading conditions. Thus, these brackets were qualified for the intended end use. Trial suiting of the brackets with the thrusters was carried out and found to meet the geometric requirements for the intended application.
Conclusion
Two kinds of brackets for aerospace applications were realized through the LPBF/ DMLS 3D printing, followed by stress-relieving heat treatment and subjected to careful characterization. the subsequent are the conclusions from this study:
- The distortion noticed on thin wall regions was avoided by adding additional stock at thin sections and removing by post-processing.
- The mechanical properties in stress-relieved condition meet the necessity as per ASTM F 3184-16 and also the achieved properties are akin to molded product. The LPBF method provides higher mechanical properties than standard molded product even in solution toughened condition.
- In the early stages, failure ascertained in 45° specimens was attributed to incomplete sintering at these layers. the basis cause was established as improper spreading of powder at one amongst the layers.
- Non-destructive testing was performed by macro CT and brackets were found to be free from defects. The porousness was approximated to be 100 µm, which can not affect the functionality of the product. The porousness noticed in Additively Manufactured components is a smaller amount than the sizes resolvable by standard NDT techniques such as ultrasonic testing and X-radiography.
- If needed in the future, structural testing confirmed that enough margins are accessible within the designed brackets with laser powder bed fusion AM route and additional weight reduction are often achieved by topology optimization through design for additive manufacturing (DfAM).

